|
It’s that time of year again; the leaves are changing colors, the days are getting shorter, everything tastes like pumpkin spice, and, at least in my neck of the woods, the boating season has come to a close. That means it’s time to roll up my sleeves (then quickly realize that it’s too cold for short sleeves and roll them back down) and get to work on winterizing the Serenity for her long winter’s rest.  I pushed for a winter lay-up period and, luckily, the other owners on Serenity have agreed that it makes sense to pull the boat off the water for the cold winter months. Our winter lay-up begins in November (as you’re reading this I am probably down in Bullfrog doing exactly what I’ve written here) with relaunching done in March. The chief reasons I wanted this dry-docking are: (1) If the boat is not in use, there is a drastically reduced chance of damage sitting in dry storage as opposed to being on the water, (2) it gives the boat a chance to dry out and hopefully prevent major maintenance issues due to mussel growth, (3) it results in a reduced insurance cost and can offset some of our costs for slip rental, which can be prorated, and (4) it allows for out of water repairs to be completed prior to the beginning of the next season, like replacing impellers and changing the lower unit lube oil. If there is the option, I would almost always opt to store my vessel on the hard over the months that it isn’t being used. Prior to being put up for the long winter’s nap, there are several things you need to do in order to make sure everything is in good shape when you pull the boat out of mothballs next Spring. I’ve winterized my fair share of boats over the years; the houseboat includes a few extra systems, but shouldn’t take more than a few hours to get ready for storage with a couple knowledgeable people (no word yet on how long it will take me and my dad). I like to winterize as much as possible while we’re in the slip, prior to haul out; pretty much everything except the main engines can be finished up prior to driving over to the ramp to be loaded up. General Maintenance Throughout the season, things have a tendency to break and the end of the year is always a good time to catch up on all the minor issues that have gotten overlooked. Fixing the loose door latch, replacing burnt out light bulbs, changing a broken light fixture, replacing the tank level sender units, rebuilding a leaking steering pump, replacing broken trim, and fixing a loose connection block on the marine head; I build a punch list over the months and then spend a couple days making sure everything is knocked off that list or, when missing all the required components, they are listed and planned for repair prior to relauch. I also include items like removing the canvas cover on the upper awning, making sure the deck chairs and tables are secured by tying them to the railings, giving everything a good cleaning, and generally making sure that everything is stowed to prevent anything from blowing away or wandering off. If you spend this time making sure everything is ship shape, it will make next Spring a whole lot easier. Fuel System Serenity carries about 400-galons of fuel and the last thing you want to have to deal with is that much stale gas. While there has been varying advice from different authoritative sources over the years, they have come to consensus and now advise storing your fuel tanks full, or at least at the 90% maximum safe fill level. With modern fuels you face several issues that weren’t present prior to the elimination of lead and the introduction of ethanol; most notably is ethanol’s propensity to absorb water and reduced resistance to microbial growth. Water is public enemy number one, and keeping the tank as full as possible reduces surface area of the tank and the volume of air that could allow for condensation. Long story short, it’s best to store your tanks full to prevent condensation and keep the gas dry. 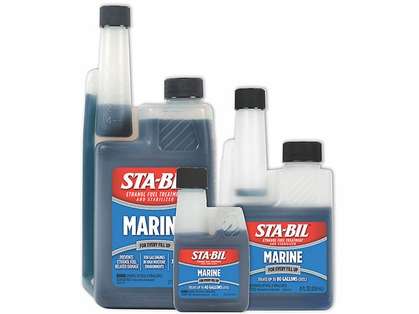 Adding a fuel stabilizer prior to the final fill up on all tanks is also advisable. A fuel stabilizer will add up to 24-months to the shelf life of your fuel. It reduces water absorption, increases lubricity, inhibits microbial growth, and boosts octane. I always try to add the stabilizer prior to the final fill up, so that the additive can be well mixed with the fuel, but realistically, the bumpy trailer ride to storage a few miles away will do a pretty good job of mixing it anyway. Potable Water Water is the greatest concern when winterizing in almost all the houseboat systems, so a logical place to start is the potable water system. Power of freezing water is impressive; just look at the cracks, potholes, and heaving in the roads throughout the Northeast to understand its immense destructive force. You want to get all the water off the boat and the potable water system is as good a place to start as any. Freezing water can burst pipes and rupture filter housings. Most of the damage I had to deal with in the plumbing system was caused by freezing. The Water Fixer filtration system had both filter housings burst, requiring replacement, and the stainless steel UV chamber had one end cap pushed off. 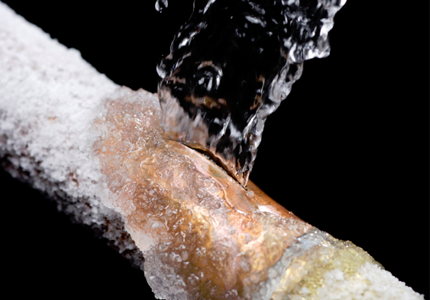 Winterizing the water system begins with emptying the water tanks; you can simply use the pressure system pump to run water through the faucets until the tanks are dry, but I prefer to utilize a portable pump to drain the tanks by connecting to the drain spigot on the tanks and run the water overboard. The water heater tank is emptied in a similar manner. You do have the option of opening the drains and letting the tanks dump into the bilge, subsequently pumping the water out with the bilge pump, but I prefer to keep my bilges dry. Once the tanks are empty, you can focus on blowing out the water lines. The easiest approach I’ve found is to purchase a $5.00 blowout adapter, like the one pictured below. This fitting allows you to attach your air compressor’s chuck to the water inlet to pressurize the system. It’s then just a matter of opening the hot and cold at each of the faucets to allow the water to be blown out of the lines. 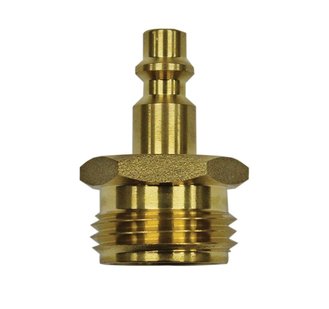 It’s important to remember to open the valve to the water tanks to be sure to blow out those lines as well. You also need to open and empty the filter housings, and disconnect the line to the pump and allow it to drain out. The drain P-traps also need to be blown out, which I do with a wet/dry-vac, but could also be done easily by removing the P-trap and dumping them out. On Serenity, we have no gray water tank, and all the sinks and shower discharge directly overboard, so I don’t have to worry about any odors or sewer gasses. However, if your system does drain into a holding tank, it’s a good idea to refill the P-trap with RV-antifreeze. 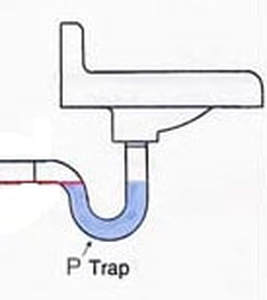 Black Water The black-water holding tanks need to be pumped out per our normal procedure, which includes back-flushing the tanks until the effluent is relatively clear and then priming the system with toilet chemicals and about 5-gallons of water. The seacocks for the toilets are then secured and I empty the filter housings. Then, leaving the filter housing loose, I run the pump to clear the lines of water, and try to blow the lines out with a wet/dry vac as best as I can. I will run the macerator pump to drain the blow and flushing lines, but usually that won't quite get all the water out of the bowl and I will have to suck it out with a wet/dry vac prior to filling the the bowl and macerator pump with RV antifreeze. 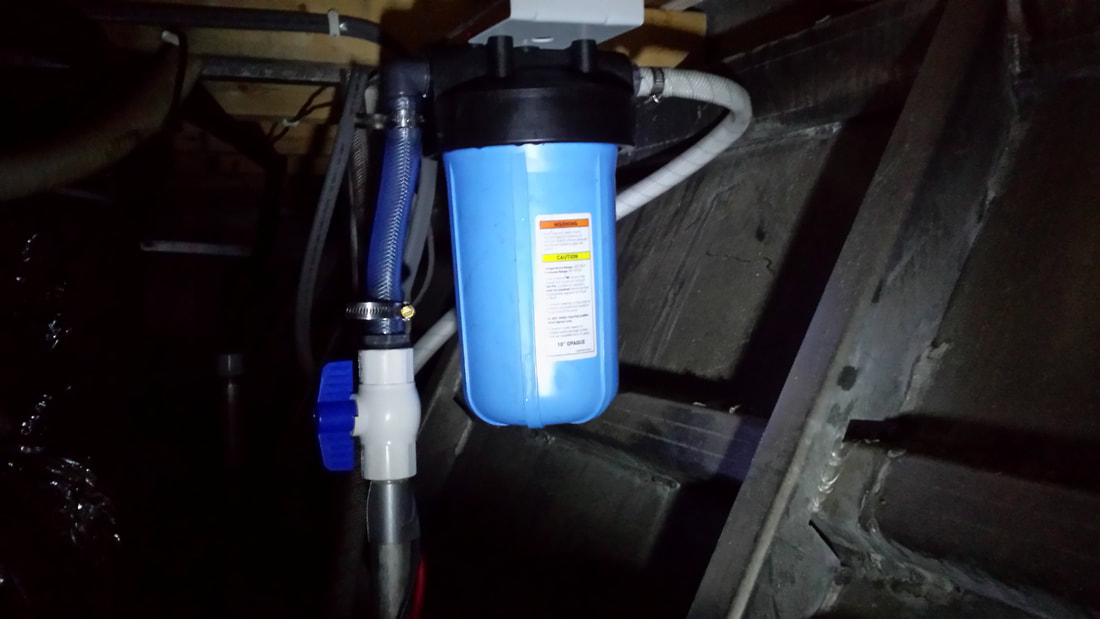 Electrical Even your electrical system needs a little attention prior to winter. The only things I really do are to ensure that the water levels on the flooded lead acid batteries (inverter and starting batteries) is at the correct level and then make sure the batteries are isolated so that an errant load doesn’t drain them flat over the winter. You need to use distilled water and a bulb syringe to fill the batteries up to the maximum fill level, which is illustrated below for the Trojan inverter batteries that were originally on the boat. 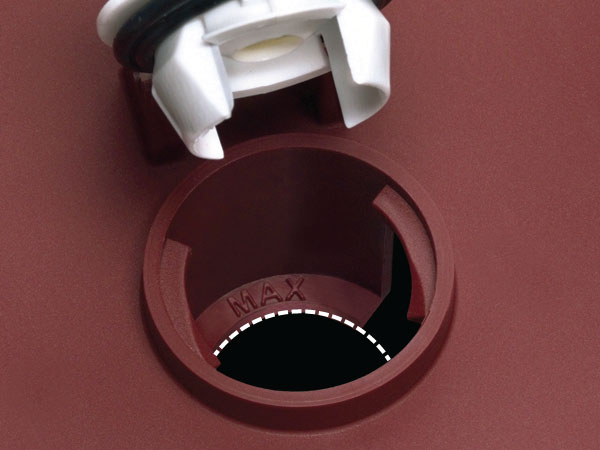 Many would advise pulling the batteries and storing them inside during those cold months. You might also put them on a trickle charger. I agree with this and take both of these steps on my small boats, but it’s not that simple with the houseboat. Serenity’s 12-batteries weigh a total of over 1100-lbs and would have to be hauled back to Colorado or Washington, since no heated indoor storage is available at the storage yard. For me that’s just not feasible, and I’ve never had any issues with the batteries just following the practice of isolating them to prevent discharge. Generator Now we’re getting to the nitty-gritty. The generator can easily be winterized while the houseboat is still in the water. Our Westerbeke has a closed cooling system with a heat exchange system that draws cooling water from the lake. The closed system is already filled with antifreeze, so you just have to worry about the raw water intake and wet exhaust. Now, the textbook method for winterizing the generator would be to pull the drain plugs in the exhaust manifold and on the heat exchanger, but I’ve found an easier approach. I close the seacock for the raw water intake, clean out and empty the sea strainer, and then disconnect the hose leading to the heat exchanger. I place the hose in a 5-gallon bucket filled with a few gallons of RV-antifreeze and then start the generator. It takes less than a minute of running to suck the bucket dry and start expelling the pink fluid over the side through the exhaust, thus displacing all of the water in the system with the biodegradable RV-antifreeze. When it looks like about 10-seconds worth of antifreeze left in the bucket, I have someone else start praying fogging oil into the carburetor, and then kill the generator. Then it’s just a matter of pulling the four spark plugs and fogging each of the cylinders, prior to replacing the plugs. Main Engines And finally, the main engines get their winterization only after moving over to the ramp for haul out. They will walk the houseboat onto the trailer and winch it into final position, so once you’re tied up at the dock by the ramp, you should be finished with the engines for the season. I like to get to the dock a little early so that we have time to do some of the winterizing prior to being hauled out. You can do this all after being hauled out, but if you want to run the engine on the hard, you will end up having to rent a run cart, if available, to ensure none of the cooling water ends up on the ground (even though under normal operation that water would be going right back into the lake…you’ll have to take that up with the EPA). Once we’re at the dock, I will shut off the fuel tanks and let the engines starve of fuel. Prior to them dying, I try to time it about right so that I can spray about 10-seconds of fogging oil into the carburetors on each of the engines; it’s easier if you do them one at a time. Once the engines have starved of fuel, you can fog each of the cylinders, but this can also be done after being hauled out. After the boat is blocked up, it’s time to finish up the winterization process. Aside from fogging the cylinders, that means draining the block and the exhaust manifold. I pull the plugs on both the manifold and the block and allow the water to drain into the bilge. I then remove the thermostat housing and use a wet/dry-vac to blowout the block and manifold. Once both drain holes are relatively dry, I shut down the wet/dry-vac and replace both plugs. I then pour RV-antifreeze into the thermostat housing port to fill the system. 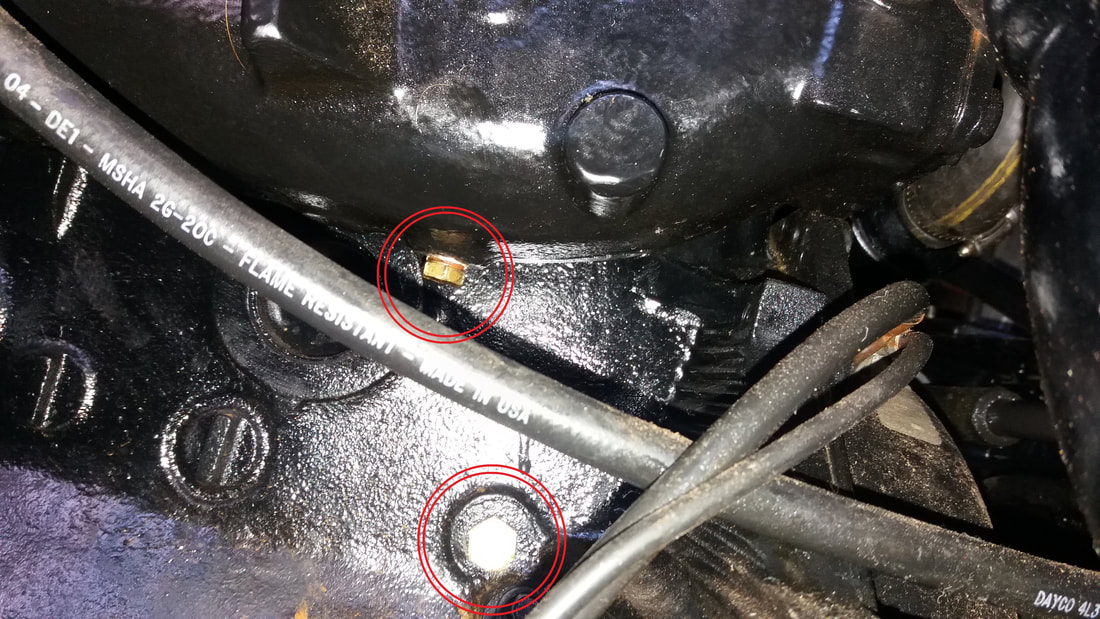 That would be the bare necessity for winterizing, but if there’s time I also like to replace the lower end lube oil and, while I’m at it, drop the lower end and replace the impellers. The impellers should last more than a year, but with the mussels in Lake Powell, I figure it’s better to be safe than sorry and open up the lower units to make sure everything is clear and put some new impellers in there. If an impeller should fail during the season, the only option is to haul the houseboat out again to work on it, which represents a $1000 obligation, so I figure the $30 for the impeller kits is well worth it.
Even if you’re not dropping the lower unit, it’s good practice to replace the lower end lube oil prior to winter storage. If any water has made its way into the lower end, you don’t want it sitting in there all winter and potentially freezing. The Mercruisers have a reservoir for the lower end lube in the engine compartment, since there’s virtually no way for water to work its way up into those reservoirs, I don’t see a need to drain them and instead clamp off the hoses running down to the lower units. Then it’s just a matter of opening the drain and vent plugs on each of the lower units and allowing them to drain. I have been known to be a little impatient, and I will often use my compressor to blow the oil out from the upper vent hole in order to speed up the process. Once they’ve run dry, I’m free to drop the lower units and replace my impellers, but I won’t go into detail on that procedure in this post. Instead, assuming you aren’t replacing the impellers, you would just go ahead and refill the outdrives with lube oil, pumping it in from the bottom drain port until it comes out the upper vent port. Then you just have to remember to remove the clamps isolating the reserve reservoirs. With all this complete, it’s finally time to button everything up and head home. Until next time, here’s wishing you fair winds and following seas.
1 Comment
2/15/2021 11:59:28
It really helped when you said keeping your boat in dry storage helps reduce the possibility of water damage. Last week, I visited my parent's house, and while we had dinner, they commented they're worried about their boat's safety during the next cold months. They purchased a boat a few months ago, so they're not that familiar with the boating world. That's why I think this information could help them prevent boat damages. Thanks for the tips about how to prepare your boat for winter storage. Leave a Reply. |
AuthorBrent Pounds has over a decade of experience in the maritime industry and has been involved in recreations boating since he was a child. See the About section for more detailed information. Archives
October 2016
Categories
All
|
 RSS Feed